
Do you ever feel like your music sounds too harsh or resonant? Like there are sounds in there that are too sharp and uncontrolled, but using an EQ might take all the life out of it, or there are just too many harsh peaks to EQ them all? You may have heard of this very popular plug in soothe2, but let’s really get under the hood with it and discover what it can do.
You can use soothe2 to tame any sort of sound, and it has many parameters you can utilize to control how it behaves. Essentially what it is doing is behaving as a dynamic EQ that automatically detects and reduces resonant frequencies in your signal as you are playing sound through it. You can control the specific range of frequencies you want it to smooth out, and you can also dial in the strength of the plug in, the attack and release in the same way as a compressor, the dry/wet ratio, and the relationship between mid/side or left/right!

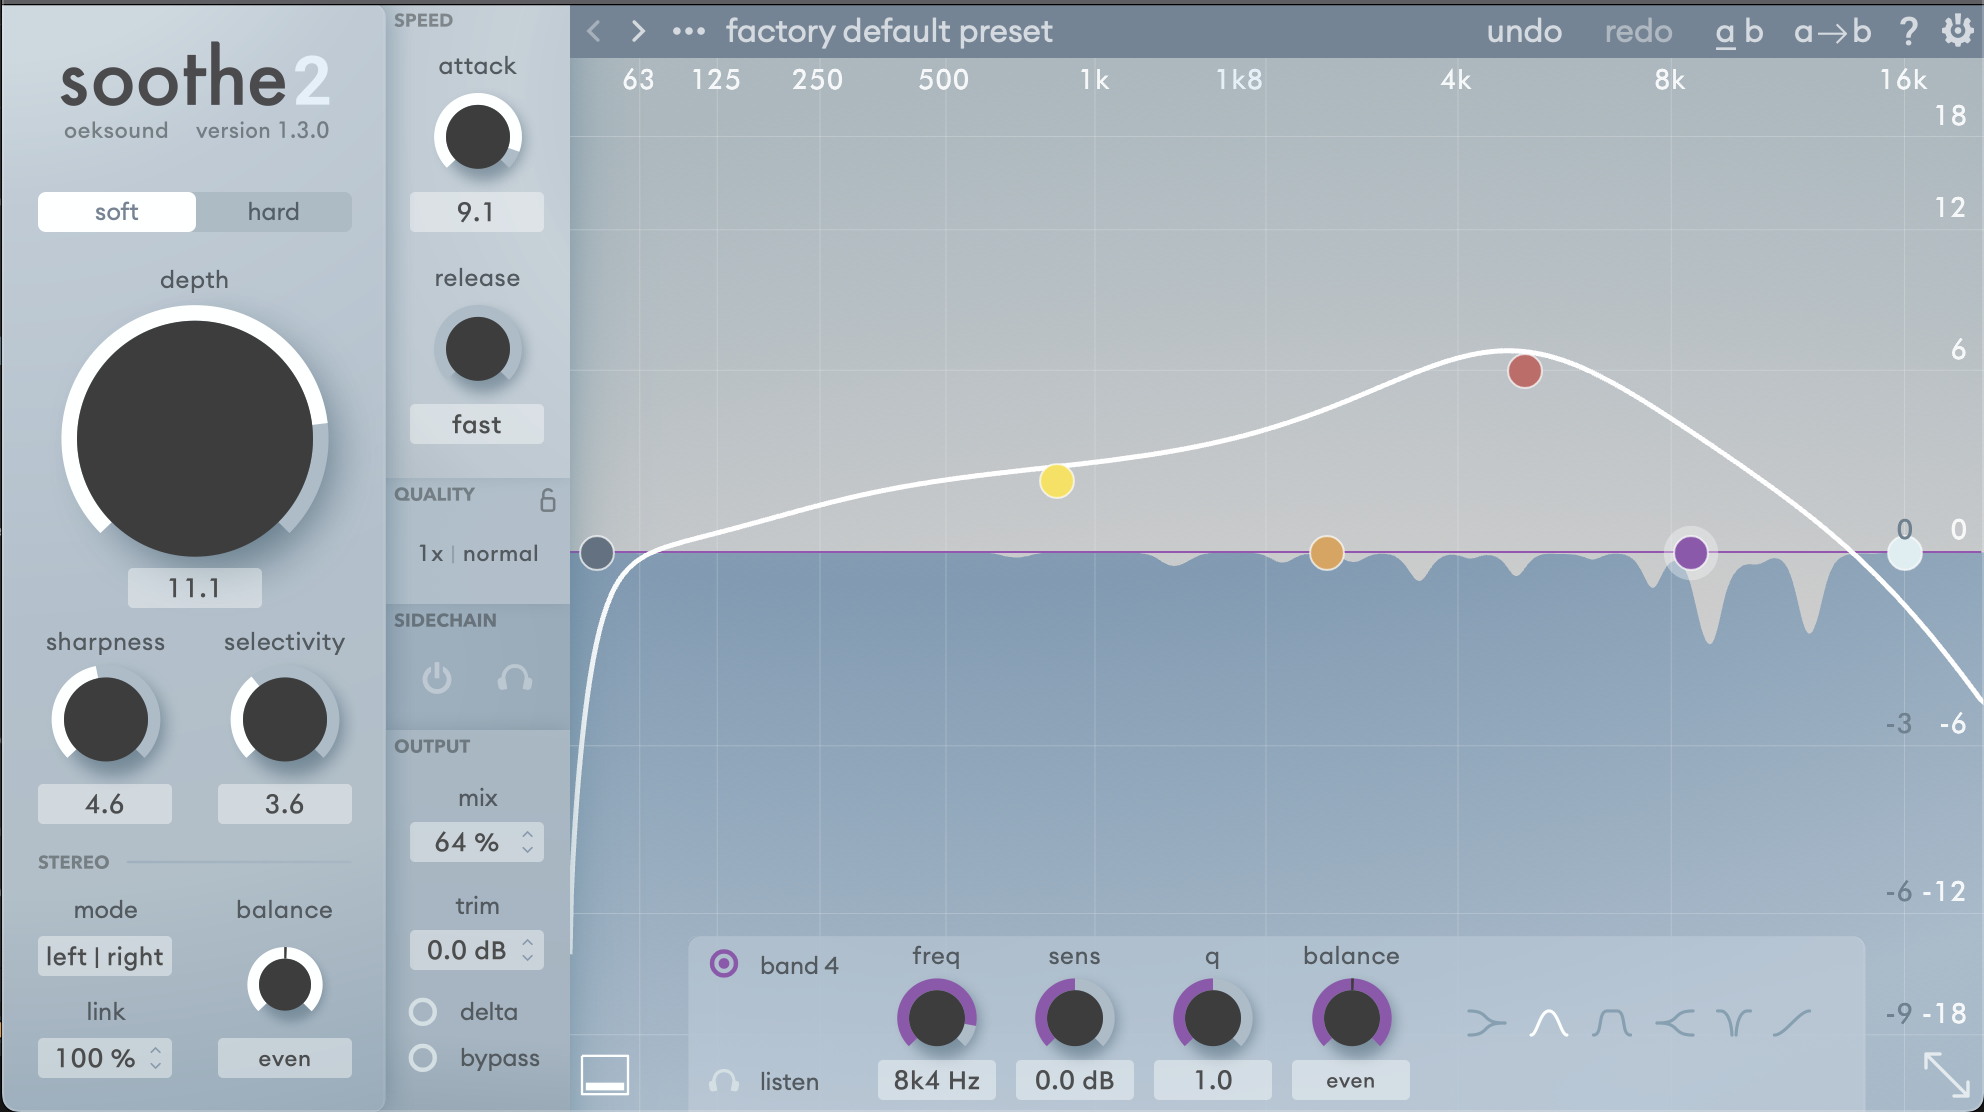
The picture above depicts the frequency graph in soothe2. You can make bands similar to an EQ, but the way it reacts is almost opposite of an EQ. The bands that you pull up higher are going to be cutting more resonances in that area of the frequency spectrum. The dark blue section on the bottom half represents the cuts being made in the incoming signal, with the dips showing exactly where and how much is being cut as you play audio through the plug in.

These controls allow you to control the intensity of the processing soothe will apply to your signal. Soft mode is more transparent, preserves transients better, is less level dependent and may cause fewer artifacts. Hard mode is more aggressive and more level dependent, use it with caution but it can help in more severe cases. Increasing the depth increases the reduction. The sharpness controls how narrow the cuts are, with more sharpness you can get more granular, removing specific frequencies in a specific sound, and with less sharpness you can address a more general area of concern, for example in a mix bus perhaps. Selectivity controls the threshold when soothe will start cutting resonances, a higher selectivity means only the most resonant of peaks will get cut, and with a lower selectivity you’ll be cutting more peaks.

The stereo section of this plug in can run in left/right or mid/side. The balance will control how much processing is applied to the mid vs side, or left vs right. The link controls how independently it will process the mid vs side or left vs right – for example at 100% link the plug in will detect all of the resonances and apply the processing to both channels, where with 0% link it will detect the channels differently and each channel will be processed based on it’s own resonances, which can in some specific scenarios be useful.

The sidechain function is a neat trick you can use with this plug in as well. To turn it on, you’ll have to route another track to the sidechain of soothe, which will vary based on your DAW, however in Ableton you will use the dropdown menu in the plugin icon down in your rack (bottom of image where it says sidechain). Then, simply click the “on” button in soothe2 where it says sidechain. Now, the cuts soothe2 makes will be triggered by the audio coming in through the sidechain, rather than the track soothe is on, but it will be affecting the track soothe is on. This can be useful to carve out very specific frequency space in two sounds that are overlapping.
The mix controls the dry/wet, so you may dial in your settings for soothe2 until it feels like its doing just a little too much and then dial back the mix, this is a great way to use this plug in tactfully. Trim is a volume control meant to compensate for gain reduction, so that you can A/B test the plug in on and off more accurately without a noticeable difference in level. Using the delta function, you can hear specifically the frequencies that are being removed independently.

The speed section behaves in a very similar way to a compressor. The slower the attack, the longer it takes for the processing to kick in after the signal is played, letting a bit of unprocessed signal pass through before starting to cut frequencies. Using a slow attack is a great trick for using soothe on a mix bus to control some energy / noise build up, usually in the higher frequencies. Using this and then dialing back the mix control can be a subtle way to smooth out your whole mix with this plug in. If you turn up the release, the cuts will take longer to return back to normal after the resonances have no longer passed the threshold to trigger the processing. If you are hearing artifacts, turning up the release a bit could help.
In conclusion, the soothe2 plug in can do a lot to help you achieve more control in your mix! You’ll want to be careful not to over use it, as you can quickly find your song will start to sound lifeless if you’ve cut out too many resonances in too many sounds. It’s a plug in that is quite unlike most of what else is out there, so you’ll definitely want to give it a try if you haven’t yet! To hear the mixes I’ve done using this plug in, check out my music here, I’m a drum and bass producer who uses this plug in all the time.
Stay creative my friend!


Leave a Reply