
Clipping – this technique has been starting to get more and more popular as opposed to compression and limiting for certain utilities these last few years. Why is everyone using so much more clipping? Well, if you’ve been in the music engineering world for any amount of time, you probably have heard of the loudness wars – the term used to describe the phenomenon of artists and engineers constantly pushing the limits for how loud they can get music to sound. Modern music in many genres as of recent years has even embraced a certain amount of digital distortion, which is distortion caused by pushing the volume of audio past it’s limits in your DAW and in the past would have been considered of poor quality and frowned upon.
To push the boundaries of the loudness of your music, without sacrificing transient punch, and with the least amount of loss of clarity, one way to do this is with clipping. However, it is best to be mindful of how you’re clipping your audio, and exactly what that clipping is doing. You could just clip it into the red of your DAW, or use one of any numerous clipper plug ins, but not all clipping is created equal. Today I want to talk about the plug in I like to use for clipping, and all of the features it has to offer: Clipshifter by LVC Audio.
Using the Clipshifter
First, why do I choose this plug in? Well, I certainly haven’t tried all the clippers on the market, but of the ones I do have, the controls for this one as well as the way the transients sound when pushed through it are more desirable to my taste. I like sticking this on the end of my master chain in lieu of a limiter most of the time. For the genre I produce, it helps me get things loud and punchy. You can use this plug in of course however you like, but I’ll give my recommendation on how to use it differently on the master channel and on individual busses / tracks.
While using this on the master channel, assuming you’ve already mixed the track and just want to use it as a final clipper, I’d advise not to change the initial / end threshold, and if you do need the threshold to be slightly lower than 0, link the initial and end. Also, be sure to turn on oversampling & double, I normally use 4x oversampling for this plugin. I would not mess with anything else while using this as a final clipper on the master.
While using this on individual tracks and busses, go crazy! Experiment with all the controls and see how they affect the audio, but I’ll give you my take based on how I typically use it. By adjusting the Initial and End thresholds and playing with the attack and release, you can control the transient and shape of drums, which I have found to be useful. Using the clip shape, harmonics, and perhaps some slight EQ, I’ve found it to perform as a saturator as well, you’ll need to hear how it sounds to know when you’ll want it on various elements!
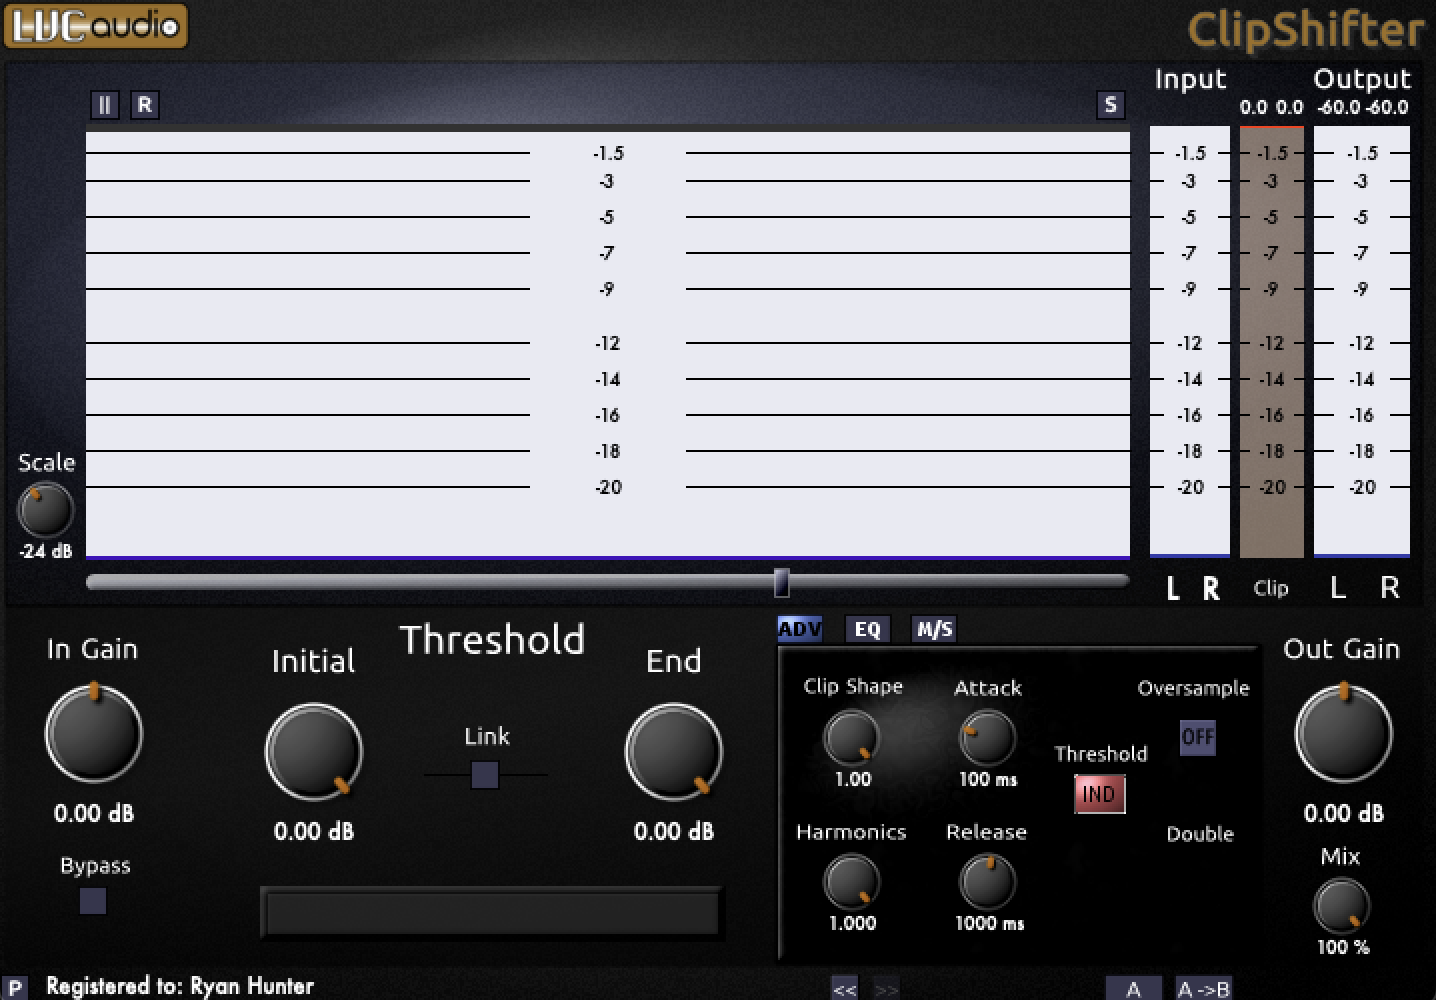
Controls of the Clipshifter

Let’s talk about some of the controls this plug in has to offer!
The Input Gain allows you to push the gain into the clipper more or less to cause more or less clipping, while the Output Gain controls the volume post processing, and the Threshold controls at what level the audio gets clipped. That’s all pretty basic, but here’s something interesting: the threshold has an initial and end, and how that works is correlated directly with the attack and release knobs in the right menu.
“After the input signal reaches the level set by the Initial Threshold, the actual threshold of the plugin begins to change toward the amount set by the End Threshold. The quickness of the shift is determined by the Attack control. After the signal decreases below the threshold, the actual threshold of the plugin begins to shift back towards the Initial Threshold setting. This is controlled by the Release control.” – Taken directly from the plug in manual, since they describe it best.
In the advanced controls tab, you’ll notice two more knobs, the Clip Shape and Harmonics. Reducing the clip shape makes the clipper react more like a compressor, softening the clipper at a less aggressive ratio rather than brick wall clipping which occurs at the default value of 1.00. Reducing the harmonics knob introduces even harmonics to the clipper, be aware that doing this will also start to increase the output gain of the clipper.
The next thing you’ll want to know about is using oversampling. This plug in offers up to 8x oversampling which is great if you plan to put it on your master. If you don’t understand oversampling, check out this recent blog I wrote dedicated to this topic here. Now, when you are using the oversampling algorithm in this plug in, the output can exceed the threshold set, and if you’re putting it on the master channel with a threshold of 0, you’re not going to want that. To remedy this, you can activate the button that says “Double” which will run the signal through the clipper again to ensure that no audio makes it above the limit set by the Threshold.
The next tab over from advanced is an EQ with a 3 band crossover. You can adjust the crossover, and then below that you can adjust the gain of each band to control the tone. The next tab over has very similar controls except instead of controlling frequency you can control the gain of the Mid and Side information, as well as access a Width knob. By clicking the M/S Mode knob you can change the Mid and Side controls to L and R instead. For both of these tabs, to control the gain, you need to turn on the Process buttons above the gain knobs. This will also turn on the clipping algorithm for that particular parameter individually.

Closing Thoughts
There are plenty of clippers out there that probably do all this and more, but this is a great one to play with if you get the chance. When you go to the LVC Audio site, this is not available as an individual purchase, but if you purchase the Clipped Max plug in, you’ll get this included for free. I haven’t played as much with the Clipped Max and I’ll have to dive into that sometime in the future, but I chose to use this after making that purchase because I felt I liked the way drums sounded when being pushed through it more. I’m a Drum and Bass producer, if you want to hear my work you can do so here.
Stay creative my friend!
-Ryahu


Leave a Reply